Hello to all! I’m trying to deal with the problem of working Python-code on a site running WordPress 🙂 And this problem turned out to be very interesting, but not immediately solved – because frankly – there is no time in the sequence of events.
In any case, all manuals designed to help with these issues begin with the fact that you need to solve the problem of working with hosting through an SSH connection. So let’s finally solve this question;) (consciously skipping the authorization question;)):
1. Activate the possibility of ssh-connection in the control panel of your hosting (drop-down menu in the upper right corner, and then select – hosting control panel):

2. In the item with the name of your hosting, select “Settings”:

3. In the column on the right we find “Settings” and the item “SSH access”:

4. If you have access enabled, do not touch anything. And if it is off, then access must be enabled;) (it’s logical) :). To do this, click on “Management” in this paragraph and get a pop-up window that looks something like this:

By default, there is 22 port for access, but no one bothers to change it;)
5. Now in the upper right corner of the hosting control panel we find the “cPanel Admin” button and click on it:

A new tab will open, in it you need to find the “Security” section and the “SSH access” item:

6. In the window that opens, poke the “SSH key management” button:

7. Find the “Create a new key” button and click:

8. We see the control panel of the created keys:

After which we click “Create Key”, resulting in something like:

Press the “Back” button, and return to the key management section
9. In this section, we observe the picture: we have the items “Public Keys” and “Private Keys”, and the key that we just created in the “Public Keys” section is not authorized to work. Let’s fix it. To do this, click on the “Management” item to the right of the name of the key you created:

after which we observe the following picture:

Click on the “Authorize key” button and get this picture:

then click the “Back” button and return to the key management point.
10. We find the section “Private keys”, and poke on the item “View/Download” near the name of your key:

11. In the window that opens, we see that we have the opportunity to download the key we created and convert the key to PPK format. It is the “Transform” item that interests us, because the PPK format is a format that is perceived by PuTTY. In order to convert the key – enter the password for the key and click on “Convert”. If everything is done correctly, then we get this:

And now this converted key – download to your computer.
12. Now go to Google and find PuTTY in it.
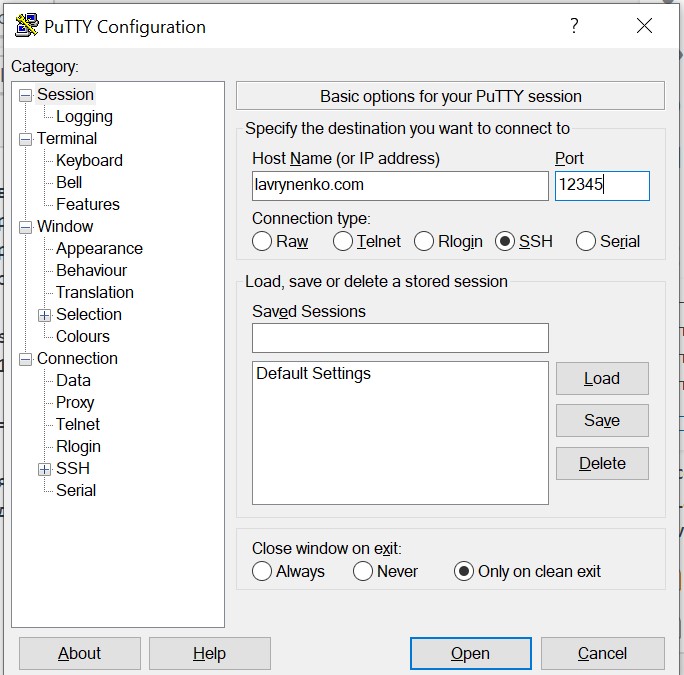
13. Download, install it, and in the opened horse of the program enter the name of the hosting to which we will connect and the port through which the connection will take place:

Now in the list on the left we find the SSH section, and in it the Auth subkey:

where we enter the address to the key that we created and converted, after which, finally, we click on the “Open” button :):

If everything is done correctly, PuTTY will display a connection window with a request for a login of access to the hosting and password:

Well, in the end – if the password and login match the true ones – we will get this window that confirms that we started working with hosting via SSH using Putty:

Congratulations 🙂 And yes, about the commands needed to work through SSH I wrote earlier 🙂 Welcome, and thank you for your attention!
If you have questions – ask them by mail or in Telegram, and just in case – a video with instructions 🙂
